Docs
The JASMIN Notebooks Service with GPUs enabled
JASMIN Notebooks Service with GPUs enabled
The JASMIN Notebook Service has recently been updated to include a GPU-enabled node. This means that JASMIN users can now run Machine Learning (ML) workflows in Notebooks. This page outlines:
Who can access the GPU-enabled Notebooks Service?
The service is available to all JASMIN users that have been granted access to the ORCHID (GPU) cluster. Existing JASMIN users can apply here .
Starting a Notebook Server with GPUs
When starting your notebook server, you will be presented with a profile picker. Select the GPU mode option to start a notebook server with GPU access:
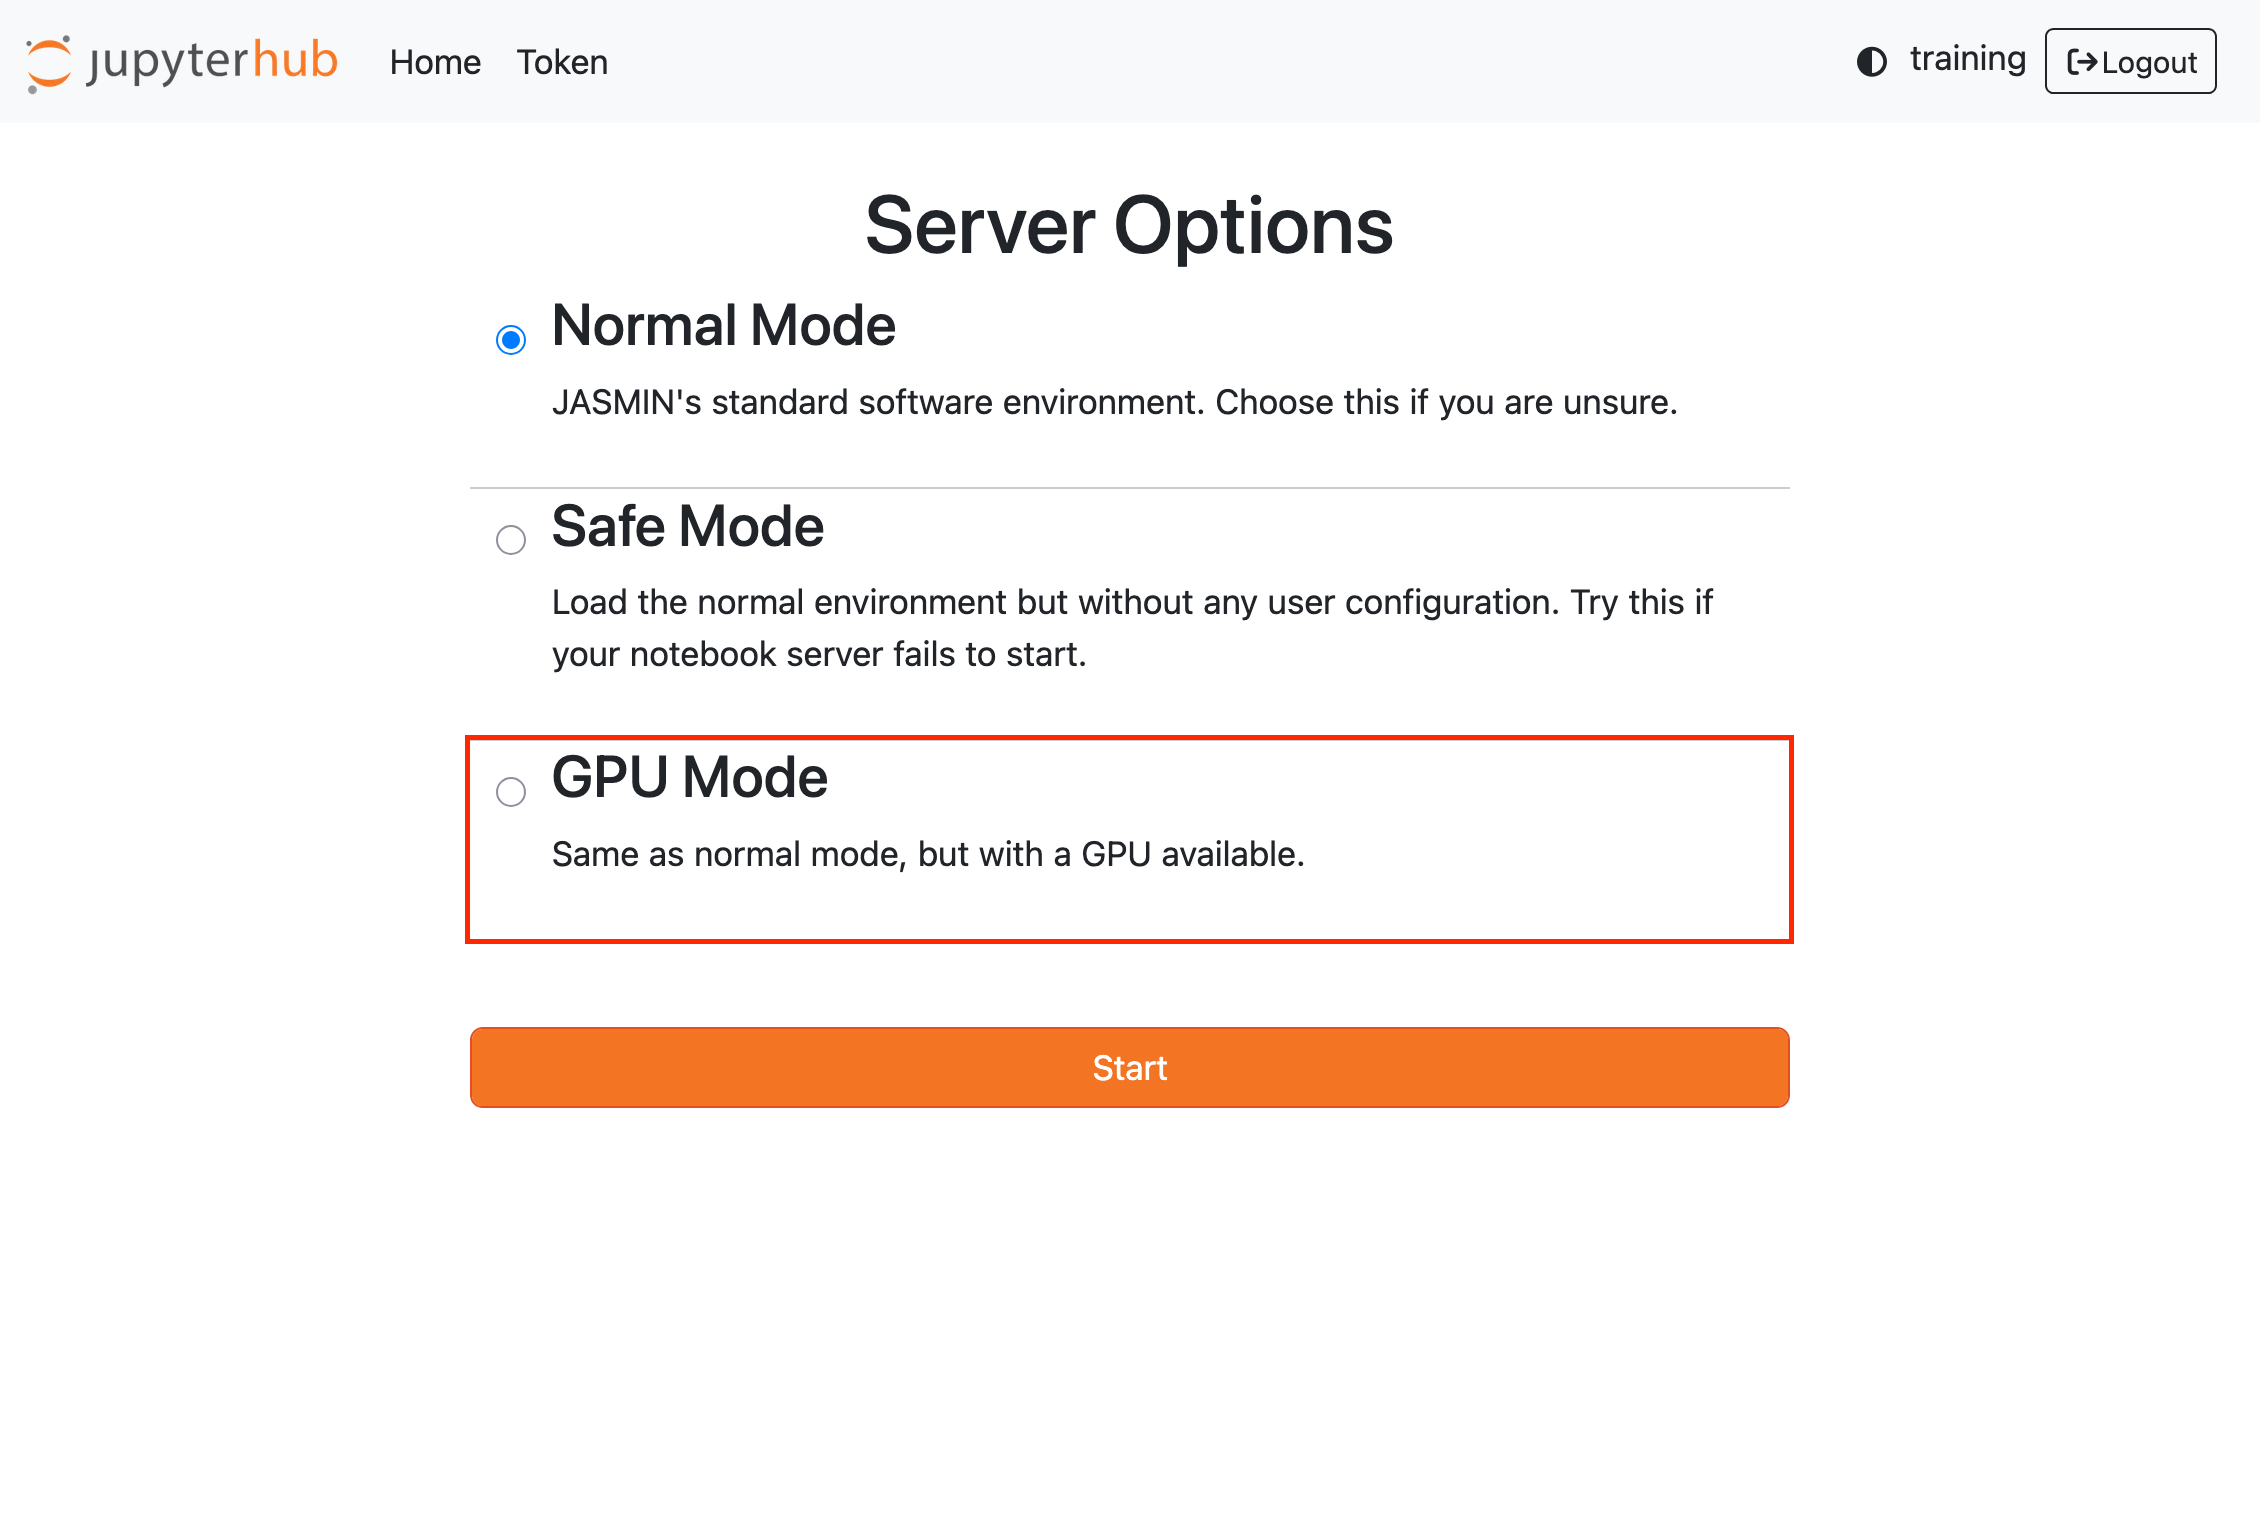
See the main notebook service page for details about the different profile options.
Which packages are available by default?
Check the top-right corner of a Notebook session to see which kernel is being used. If you don’t need any specialist Machine Learning (ML) libraries, you would typically choose the latest Jaspy (Python) kernel, which has many of the common open-source packages used within environmental science:
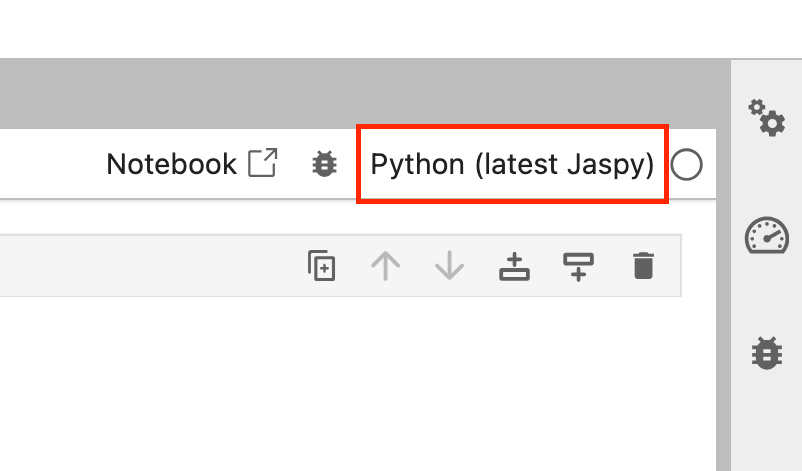
You can click on the name of the kernel to select a different one.
If you want to work with GPUs, you are likely to want to install other packages that
are common in ML, such as PyTorch and TensorFlow. This topic is discussed below.
GPU availability
In order to check that your notebook is running on a server with GPUs, you can use the built-in NVIDIA commands, such as:
!nvidia-smiIf GPUs are enabled, the output should look like this:
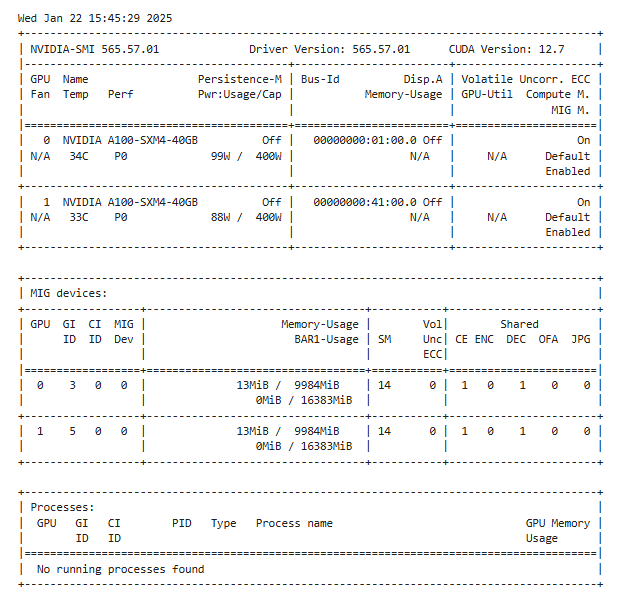
Understanding the nvidia-smi command output
1. The Header section
The first section includes:
- CUDA Version: 12.7: The version of the CUDA toolkit that the NVIDIA driver supports.
- GPU 0 / GPU 1: There are two physical NVIDIA A100 GPUs in the system.
- Name: The model is
NVIDIA A100-SXM4-40GB. Each GPU has 40GB of on-board memory. - Memory-Usage: Shows
N/Abecause these GPUs are in MIG mode (Multi-Instance GPU), so memory usage is not reported here in the usual way. Memory usage for MIG slices is shown in the dedicated MIG section (below). - GPU-Util: Also
N/Afor the same reason (MIG is active, so usage must be looked at per MIG instance).
2. The MIG section
The second section introduces MIG (Multi-Instance GPU) . When a GPU is running in MIG Mode, it allows each GPU to be partitioned into multiple instances, each acting as a smaller independent, or virtual, GPU. Because MIG is turned on, you see “N/A” in the normal memory usage fields. Instead, you have a dedicated table for each MIG device:
- GPU: This repeats the GPU ID (0 or 1).
- GI ID (GPU Instance) and CI ID (Compute Instance): Each MIG slice is defined by a GPU instance and a compute instance.
- MIG Dev: The MIG device index.
- Memory-Usage (13MiB / 9984MiB): Each MIG slice here is allocated around 10GB (
9984MiB) of GPU memory. Currently, only 13 MiB is being used, likely overhead. - BAR1-Usage: This is the amount of memory mapped via the BAR1 aperture (used for buffer transfers).
- CE / ENC / DEC / OFA / JPG: These columns refer to hardware encoder/decoder and other specialized engines available to each MIG slice.
3. The Processes section
The third section, processes, indicates what is running on the GPU/MIG instances:
- No running processes found: There were no active workloads on the GPUs or MIG instances at the time this command was run.
In short: There are two physical A100 GPUs. Each is in MIG mode and is presenting one virtual GPU instance with 10GB of memory. Currently, neither GPU has any running processes, so they’re essentially idle. The top-level memory usage fields are “N/A” because MIG splits the GPU resources, and the usage is shown in the MIG devices table below.
Getting the GPU and MIG device IDs
The following command will give you the exact IDs of the available GPUs and MIG instances:
!nvidia-smi -LThe output will be something like:
GPU 0: NVIDIA A100-SXM4-40GB (UUID: GPU-2927d07e-3fe9-7904-9e08-b08b82d9a37d)
  MIG 1g.10gb     Device  0: (UUID: MIG-6e95ef19-5145-571b-b040-7e731f1c1af3)
GPU 1: NVIDIA A100-SXM4-40GB (UUID: GPU-e109d8d9-923e-7235-0429-96b7fdbcbd30)
  MIG 1g.10gb     Device  0: (UUID: MIG-b4bcd4f3-6f69-516d-9404-b5ada80d760b)
Resource allocation
The current allocation of GPUs to the JASMIN Notebook Service is as follows:
- 1 GPU Node serves 4 physical GPUs (
NVIDIA A100-SXM4-40GB). - Each GPU is partitioned, using MIG, into 4 virtual GPU instances.
- Each user is allocated 2 virtual GPU instances for their own notebook instance.
- Each virtual GPU instance has 10GiB of memory.
Software environments and Machine Learning packages
Users should create their own virtual environments to install ML packages for use with GPUs. We recommend this approach:
- Create a virtual environment ("venv"), for example
ml-venv. Follow the Python virtual environments guide for detailed instructions. - Install the packages you require into that venv. For example, if you needed
pytorchandtorchvision, you would runpip install torch torchvision(including specific versions if needed). NOTE: Many ML packages are very large and can take several minutes to install. Ensure you have sufficient space in your home directory (see warnings below). - Install
ipykernelinto your venv and register it as a kernel:python -m ipykernel install --user --name=ml-venv. See the kernel registration instructions for details. - Once you have installed your kernel, it should appear as an option in the Launcher as outlined in green in the diagram below. The Launcher is accessible from the File menu.
Specific advice on installing TensorFlow for use with GPU Notebooks
The general-purpose Python 3 + Jaspy kernel already includes a version of TensorFlow,
but it was compiled against CPU-only hardware.
To use TensorFlow with GPUs, we recommend creating a virtual environment and installing the GPU-enabled version there:
- Follow the instructions above to create a virtual environment
- Install TensorFlow with GPU support:
pip install tensorflow[and-cuda] keras- Register your environment as a kernel with
python -m ipykernel install --user --name=ml-venvand select it when running your notebooks
Alternative (not recommended): You can install TensorFlow directly using !pip install
in a notebook cell, but this installs packages into ${HOME}/.local/lib/python*/site-packages/
which can cause conflicts and prevent your notebook server from starting. If you choose this
approach and encounter problems, use Safe Mode to recover (see warning above).
You may need to restart your Notebook kernel before the newly installed version of TensorFlow can be imported. See below for instructions on importing and checking that the GPUs are visible to your Notebook session.
Specific advice on installing PyTorch for use with GPU Notebooks
Unlike TensorFlow, PyTorch is not installed within the Python 3 + Jaspy kernel so
you will need to install it yourself.
To use PyTorch with GPUs, we strongly recommend creating a virtual environment and installing PyTorch there:
- Follow the instructions above to create a virtual environment
- Install PyTorch:
pip install torch torchvision- Register your environment as a kernel with
python -m ipykernel install --user --name=ml-venvand select it when running your notebooks
Alternative (not recommended): You can install PyTorch directly using !pip install
in a notebook cell, but this installs packages into ${HOME}/.local/lib/python*/site-packages/
which can cause conflicts and prevent your notebook server from starting. If you choose this
approach and encounter problems, use Safe Mode to recover (see warning above).
You may need to restart your Notebook kernel before the newly installed version of PyTorch can be imported. See below for instructions on importing and checking that the GPUs are visible to your Notebook session.
Handling multiple/conflicting versions of software packages
It is common to find that different workflows will require different versions of software packages. In the fast-moving world of ML, the libraries and their dependencies often change and this can cause problems when trying to work within a single software environment.
If you encounter this kind of problem, we recommend that you create multiple
virtual environments and their associated kernels. You can then select the
appropriate kernel for each notebook. It may also be worth investing the time
in capturing exact versions of the relevant packages so that you can reproduce
your environment if necessary. Python packages often use a requirements file
(typically named requirements.txt) to capture the dependencies. For example:
scikit-learn==1.5.1
torch==2.5.1+cu124
torchvision==0.20.1+cu124
All packages listed in a requirements file can be installed with a single command:
$ pip install -r requirements.txtImporting PyTorch or TensorFlow and testing that they work with CUDA
CUDA is system that connects the Python libraries to the GPU system (on NVIDIA hardware).
When we install PyTorch, or many other ML packages, it should automatically detect CUDA
if it is available. Assuming that you have followed the instructions to create a venv
and install PyTorch, then you can check for CUDA with:
>>> import torch
>>> print("Is CUDA available? ", torch.cuda.is_available())
Is CUDA available?  True
The same thing is possible with TensorFlow:
>>> import tensorflow as tf
>>> print(tf.config.list_physical_devices('GPU'))
[PhysicalDevice(name='/physical_device:GPU:0', device_type='GPU'), PhysicalDevice(name='/physical_device:GPU:1', device_type='GPU')]
Warning about large ML packages and HOME directory disk quota
Please be aware that installing ML packages (especially TensorFlow and PyTorch)
requires multiple gigabytes of free space in your $HOME directory. If you are
near your quota (100GB), installation may fail or you may encounter problems
saving notebooks.
Common symptoms of quota issues:
- Installation failures (may not explicitly report quota violation)
- “403 forbidden” errors when trying to save notebooks
- Notebook server fails to start
To check your home directory usage, run the following from a login machine or a sci server. pdu is not available in the terminal in the notebooks service.
pdu -sh ~See the
HOME directory documentation
for details on managing your disk usage, and the
troubleshooting section
on the main notebook page for help with quota-related errors.
Guidelines and Best Practices
Efficient GPU usage
Please make use of GPUs efficiently in your code. If you only need CPUs, then please use the standard Notebook service. One way to ensure that the resource is being efficiently used is to stop your notebook server, via the Hub Control Panel (see the File menu) when not actively needed. Be sure to save your notebook before stopping the server.
Memory and Resource Limits
The per-user memory limit for a given notebook is given in the bar below (typically 16GB). On the GPU architecture there is 10GiB per virtual GPU.
Scaling up your workflows
Experienced JASMIN users will be familiar with the resource limitations of the Notebook Service. Whilst it is great for prototyping, scientific notebooks and code-sharing, it does not suit large multi-process and long-running workflows. The LOTUS cluster is provided for larger workflows, and it includes the ORCHID partition for GPU usage.
We recommend that you use the GPU-enabled Notebook Service to develop and prototype your ML workflows, and migrate them to ORCHID if they require significantly more compute power. Please contact the JASMIN Helpdesk if you would like advice on how to migrate your workflows.
Getting Advice on Machine Learning
For advice on machine learning packages and suitability for different applications, you could make use of the NERC Earth Observation Data Analysis and AI service (NEODAAS). See the NEODAAS website for details.
A Notebook to get started
An introductory notebook, which includes most of the information provided on this page, is available on GitHub . It may provide a useful starting point for your journey.