Docs
Graphical Linux desktop using NoMachine NX
Graphical Linux desktop using NoMachine NX
Introduction
A graphical Linux desktop can be accessed within the JASMIN environment via the nx servers. This is ideal for use with graphics-heavy tasks like interactive work with large images, and is recommended over standard X11 graphics.
Using graphical applications over a wide-area network can be very slow, and is not recommended or supported on JASMIN. Using a client application to connect to the nx servers provides a graphical desktop within the JASMIN environment itself. This results in much better performance, particularly if you need to interact with what’s being displayed. The desktop environment also includes a Firefox web browser which can be used to access internal-only web resources.
nx servers
The following servers are available for accessing a graphical desktop. These servers have identical configuration, so you can use any one of them from any network location:
| Server name |
|---|
nx1.jasmin.ac.uk |
nx2.jasmin.ac.uk |
nx3.jasmin.ac.uk |
nx4.jasmin.ac.uk |
How to set up a connection using NoMachine Enterprise Client
The client application supported by JASMIN is NoMachine Enterprise Client (NOT “NoMachine Enterprise Desktop” or “NoMachine” which you may also come across). You can download the appropriate version for your local machine from the NoMachine website . You may need to ask your organisation’s IT helpdesk to install the software for you. Please note that JASMIN does not support any client applications for Windows 10.
Creating a connection profile
- Open NoMachine Enterprise Client.
- In the “Machines” view, select “Add” in the top left corner of the window.
- From the drop-down list, select “Add connection”.
- You’re now in the “Address” tab. Type a name for this connection profile, and the full hostname from the list of
nxservers above, e.g.nx1.jasmin.ac.uk. - From the drop-down list, set the Protocol to “SSH”, which will change the port to 22.
- Go to the “Configuration” tab.
- Choose “Use key-based authentication with a SSH agent”, then click the “Modify” button to the right.
- IMPORTANT: Make sure you tick the box “Forward Authentication”.
- Click the back button in the top left corner to go back to the “Configuration” tab.
- Click “Add” in the top right corner.
Video instructions for creating a connection profile on each platform:
Connecting
-
Follow the instructions in our Getting Started section to load your SSH private key into an agent.
- Note for Linux users: You may find that a “local” ssh-agent does not work for connecting via NoMachine Enterprise Client. Please use the global one for your desktop environment, e.g.,
gnome-keyring-daemon. - Note for MobaXterm users: MobAgent does not work for connecting via NoMachine Enterprise Client. You will need to use an alternative Windows 11 agent.
- Note for Linux users: You may find that a “local” ssh-agent does not work for connecting via NoMachine Enterprise Client. Please use the global one for your desktop environment, e.g.,
-
Open NoMachine Enterprise Client.
-
In the “Machines” view, select the machine you created and named in the previous steps, and click “Connect”.
-
Enter your JASMIN username in the box and click “OK”.
-
You may see a list of all the other desktop sessions currently in progress from other users. Ignore these.
-
Select “Create a new Red Hat virtual desktop”, then click “Create”. If you can’t see the “Create a new Red Hat virtual desktop” option, click the “New desktop” button at the top of the screen and it should appear.
-
Select a screen setting from the list of icons at the bottom. The recommended setting is “Fit to window” (leftmost icon).
-
Read the instructions for how to show the NX menu once in the session. Click “OK” to dismiss the instructions.
-
Read and dismiss the subsequent information about NX and desktop environments by clicking “OK”.
-
You should now see a Linux desktop on the server you are connected to.
-
Open the “Terminal” application.
-
To make an onward connection, e.g., to a
sciserver, run your SSH command with the-Xoption as shown in the command below BUT replacingsci-*-*with the name of a specific sci server ( see list of available servers here):ssh -X sci-*-*.jasmin.ac.uk -
You can test the graphics functionality by opening the
xtermapplication:xterm
Video instructions for connecting on each platform:
This video covers the whole process, including how to convert the key using PuTTYgen and load it using Pageant, then set up a connection and use it to connect.
Closing your connection
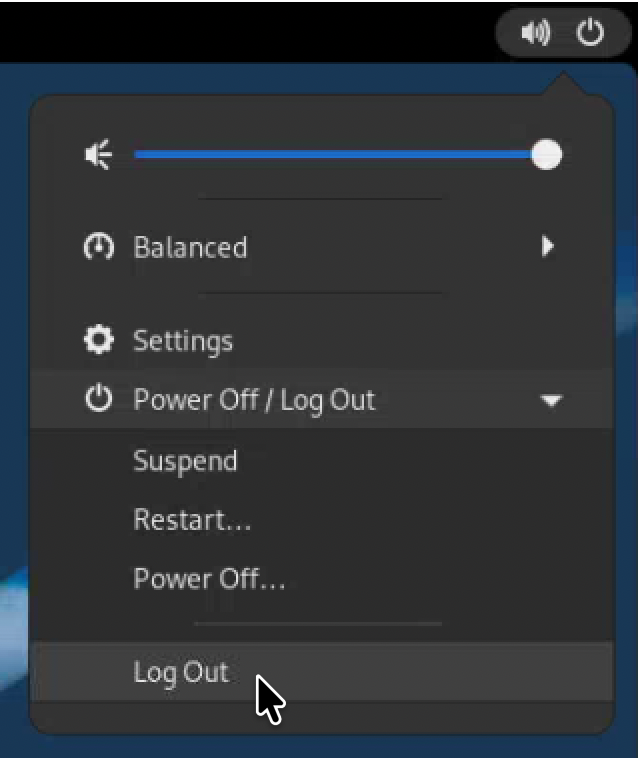
When you have finished working, please close down your session by clicking the power button in the top right corner of the desktop and clicking “Log out” (NOT “Shut Down”).
Notes
- The
nx*servers are only for use with NoMachine Enterprise Client, as described above. Please only use them for this purpose, to help preserve system resources. - Please do not run any resource-hungry processes on the
nx*servers. - Creation of virtual desktop sessions is limited to one session per user.
- Remember to make sure you are using the correct and most recent stable version of NoMachine Enterprise Client (NOT NoMachine Enterprise Desktop or any other applications from NoMachine). To check which application you are using, go to Settings > Updates, and check the “Product” field says NoMachine Enterprise Client. You can also configure the application to check for updates and/or apply them automatically by going to Settings > Updates.
- When prompted for a passphrase by NoMachine Enterprise Client, make sure to use the PASSPHRASE associated with your SSH private key, and not the PASSWORD associated with your JASMIN account.
Troubleshooting
Can’t find private key when setting up connection profile
The location of your private key on your local machine may be in a hidden directory, usually ~/.ssh. You may need to enable the display of hidden files/directories on your local machine before you can navigate to the right place and copy the location. To resolve this, according to your platform:
In Finder, your home directory may not be accessible by default. If you can’t access the path (usually /Users/<username>), or can’t see it in the list of locations:
- Go to Finder > Settings > Sidebar.
- You should see a list titled “Show these items in the sidebar”.
- Make sure the box next to your username is ticked and close this menu.
Once you can access your home directory, you should be able to see the subdirectory .ssh. If not, you may need to use the keyboard shortcut
CMD+SHIFT+.
.
Authentication errors (particularly for Windows 11 users)
Check key type
Using an ECDSA key pair rather than RSA will solve most problems. See further advice in Generate SSH key pair. Remember to wait 15 minutes after uploading your new public key before trying to connect, so the new key can be made available in all the places it needs to be.
Check key format (PuTTYgen users)
If you created your SSH key pair using the “PuTTYgen” application, you may see “Authentication failed” when connecting using NoMachine Enterprise Client, even if the same key pair usually works for terminal connections. This can sometimes be resolved by converting your private key to “OpenSSH format” before using it with NoMachine Enterprise Client. Your public key will stay the same and does not need to be re-uploaded to the Accounts Portal.
To convert your private key:
- Open PuTTYgen and “Load an existing private key file” (click “Load”).
- Ignore the notice about saving it in PuTTY’s own format (this is not necessary here) and click “OK”.
- In the PuTTYgen menu, select “Conversions”, then “Export OpenSSH key”.
- Save the newly-formatted private key file locally. The passphrase needed to unlock it should not have changed.
- Use this newly-formatted key file with NoMachine NX.
Connection timeout
Please make sure you have selected “SSH” as the protocol on port 22, rather than the proprietary “NX” protocol. If you select “NX” as the protocol, you may see an error similar to the following when you try to connect:
A connection timeout has occurred while trying to connect to 'nx1.jasmin.ac.uk' on port '4000'.
The issue could either be caused by a networking problem, by a firewall or NAT blocking incoming
traffic or by a wrong server address. Please verify your configuration and try again.
Can’t connect or reconnect to a session
Check disk usage
If disk usage of your JASMIN home directory is near or over the 100G limit, it may prevent you from writing any new temporary files. This can prevent NoMachine from starting a new session or reconnecting to an existing session. You may see the following error:
X11 connection rejected because of wrong authentication.
You can check your disk usage by connecting to JASMIN via the terminal, and running pdu -sh $HOME. If you are near or over 100GB disk usage, delete some files from your home directory to clear space, and re-check until you are well below the limit.
Terminate previous session
If a previous session fails to terminate correctly, it may prevent you from connecting or reconnecting. In this case, the client may get stuck with a “spinning wheel” before eventually timing out.
You can terminate your own previous session as follows:
- Follow the instructions in Connecting, up to the point where all the other users’ sessions on the machine are displayed.
- Find the session corresponding to your username.
- Right-click the session and select “Terminate session”.
Note that you may lose any unsaved work in the session that you terminate, but it should clear the stuck session and allow you to reconnect. Please try this before reporting an issue to the helpdesk, as it is the most likely solution.
Transposed keys (particularly for Mac users)
After successfully making the first connection, some users find that in subsequent connections to the same connection profile, some keys are transposed or do not work at all. This is particularly the case for the arrow keys, and symbol keys like @ and ". You can adjust the keyboard settings by going to Settings > Input. If this does not help, some users find this issue is resolved by updating, or completely re-installing NoMachine Enterprise Client.
For a full, clean re-installation of NoMachine Enterprise Client:
- Uninstall the NoMachine Enterprise Client.
- Delete the
%USERPROFILE%\.nx(Windows 11) or~\.nx(Mac/Linux) directory on your machine. - Delete the
%USERPROFILE%\Documents\NoMachineor~\NoMachinedirectory on your machine (beware this will remove all connection profiles). - Reboot your local machine, then re-install NoMachine Enterprise Client and try again.
Can’t make onward connections
Check initial connection method
Previously, we recommended a method where you specify the location of your SSH key each time you connect. Configurations set up in this way may work for the initial connection, but do not seem to work for an onward connection to a sci machine (especially with more recent versions of NoMachine Enterprise Client). Please use the “agent” method to make your initial connection,
as described above.
Check key type
Using an ECDSA key pair rather than RSA will solve most problems. See further advice in Generate SSH key pair. Remember to wait 15 minutes after uploading your new public key before trying to connect, so the new key can be made available in all the places it needs to be.
If this is still a problem 15 minutes after updating your public key, try a full, clean re-installation, as described above.
JASMIN account with long username
JASMIN account usernames have been limited to 8 characters since 2017, as long usernames can cause problems with the NX service. Server names are also kept short for this reason. If your username is over this limit (especially if it is longer than 13 characters) and you are facing problems when using NoMachine Enterprise Client, please contact the helpdesk .
Can’t display graphics from sci machine or other onward connection
Make sure to use the -X option in the SSH command when you make an onward connection to another machine. If you are using -X and it still doesn’t work, try using -Y instead.
Session doesn’t persist when closing and reopening the client
Open sessions consume resources even when not in use, meaning sessions are sometimes killed when machines run out of resources. Please do not report this as an issue to the helpdesk. Save your work frequently and log out of your session when you are finished: this frees up resources for other users.
“It worked yesterday”
For occasions where “it worked last time I tried to connect, but now doesn’t”, please first try the above steps to terminate any previous session which might have got stuck. Otherwise, the time-honoured IT support advice of “turning it off and on again” is applicable: try restarting the machine where you are using NoMachine Enterprise Client, as this can sometimes clear issues with the client, your machine, or your network connection. Don’t forget to reconnect via your VPN if available.